Featured Posts

Saturday, 4 May 2013

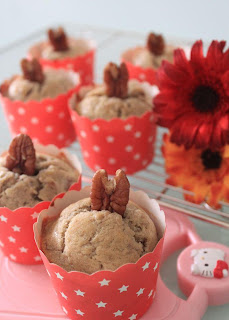
How to Make Moist banana and pecan muffins At Home

Hello friends,we are right back with new dish with Fantastic taste for you.i'm sure you will enjoy this recipe at your home.I hope you will follow the guidelines for making this recipe as given follows and wish you all the best for your cooking at your home and respond me about your dish.
  1. Preparation time: 15-20 minutes.
  2. Cooking time: 22-25 minutes.

 
How to Make Moist banana and pecan muffins At Home

Ingredients For Moist banana and pecan muffins


  • 150g plain flour
  • 1 1/2 tsp baking powder
  • 55g butter or margarine, at room temperature
  • 80g caster sugar
  • 1 large egg
  • 1 tsp vanilla extract
  • 3 medium bananas, mashed
  • 50g pecan nuts, roughly chopped
  • 10 whole pecan, to garnish (optional)
  • 5 tbsp fresh milk

Method For making Moist banana and pecan muffins

  • Preheat oven to 190°C. Line the muffin tin with 10 paper liners.
  • Sift the flour and baking powder into a small bowl and set aside.
  • With an electric mixer, cream the butter and sugar together. Then, add the egg and vanilla extract and beat until fluffy. Mix in the banana.
  • Add the pecans. On low speed, beat in the flour mixture alternately with the milk. Do it in 3-4 batches.
  • Spoon the mixture into the prepared liners, filling them two-thirds full. Bake in preheated oven for 22-25 minutes, or until a skewer inserted into the centre of the muffin comes out clean.
  • Allow to cool in the tin for 10 minutes, before removing and placing on a wire rack to cool completely. Top each muffin with a whole pecan nut, if desired.

How To Make Baked Rice Krispie Chicken recipe at Home

I have many good recipes that I fall back on for making baked chicken recipe at home that has the look and taste of fried chicken. This recipe for Baked Rice Krispie Chicken is a new one. This recipe is simple and quick to prepare with an easy clean up.

How To Make Baked Rice krispie Chicken Recipe At Home

Ingredients For Baked Rice Krispie Chicken

  • Boneless, skinless chicken breast pieces
  • 1/4 cup olive oil
  • Seasoned salt, to taste
  • Rice Krispie cereal (I used 1 cup for two breast portions)

Method To Make Baked Rice Krispie Chicken At Home

  • Preheat oven to 400 degrees F. Prepare a sheet pan by lining with parchment paper. Rinse and dry chicken pieces. Place olive oil in a shallow bowl. Dip each chicken piece in the olive oil, then sprinkle with seasoned salt. Roll the chicken in a shallow bowl of Rice Krispie cereal until well coated on both sides. Place chicken pieces on prepared pan. Bake in preheated oven for 30 minutes or until chicken is done.
How To Make Baked Rice krispie Chicken Recipe At Home
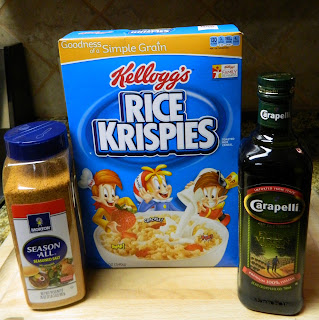
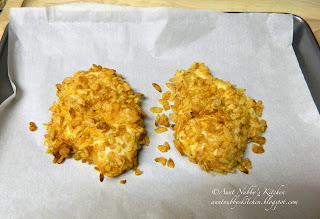
  • To make this recipe you will need chicken breast portions, olive oil, seasoned salt, and Rice Krispie cereal.
How To Make Baked Rice krispie Chicken Recipe At Home
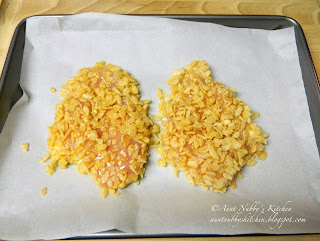
  • Dip the chicken pieces in olive oil, sprinkle with seasoned salt, then roll in cereal. 
How To Make Baked Rice krispie Chicken Recipe At Home
  • Bake chicken for about 30 minutes.
How To Make Baked Rice krispie Chicken Recipe At Home
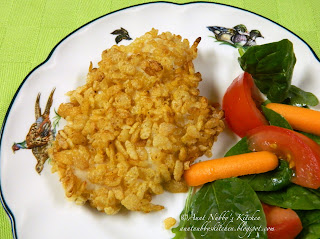
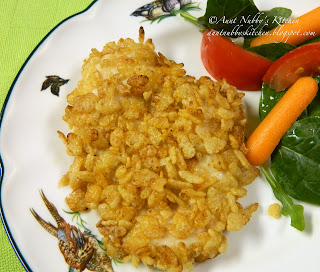
  • This chicken is crispy on the outside and tender on the inside. I love this Baked Rice Krispie Chicken, and I think this is a recipe that will suit just about everyone's taste.

Friday, 3 May 2013

How to Make Chicken Tikka Masala recipe At Home


Hello friends,we are right back with new dish with Fantastic taste for you.i'm sure you will enjoy this recipe at your home.I hope you will follow the guidelines for making this recipe as given follows and wish you all the best for your cooking at your home and respond me about your dish.
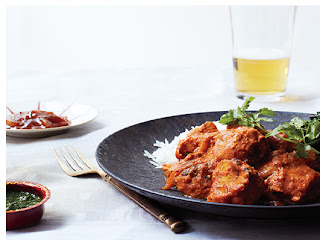
chicken tikka masala recipe at home

Ingredients To add In Chicken tikka Masala Recipe

  • 6 garlic cloves, finely grated
  • 4 teaspoons finely grated peeled ginger
  • 4 teaspoons ground turmeric
  • 2 teaspoons garam masala
  • 2 teaspoons ground coriander
  • 2 teaspoons ground cumin
  • 1 1/2 cups whole-milk yogurt (not Greek)
  • 1 tablespoon kosher salt
  • 2 pounds skinless, boneless chicken breasts, halved lengthwise
  • 3 tablespoons ghee (clarified butter) or vegetable oil
  • 1 small onion, thinly sliced
  • 1/4 cup tomato paste
  • 6 cardamom pods, crushed
  • 2 dried chiles de árbol or 1/2 teaspoon crushed red pepper flakes
  • 1 28-ounce can whole peeled tomatoes
  • 2 cups heavy cream
  • 3/4 cup chopped fresh cilantro plus sprigs for garnish
  • Steamed basmati rice (for serving)

Method To Make Chicken Tikka Masala

  • Combine garlic, ginger, turmeric, garam masala, coriander, and cumin in a small bowl. Whisk yogurt, salt, and half of spice mixture in a medium bowl; add chicken and turn to coat. Cover and chill 4-6 hours. Cover and chill remaining spice mixture.
  • Heat ghee in a large heavy pot over medium heat. Add onion, tomato paste, cardamom, and chiles and cook, stirring often, until tomato paste has darkened and onion is soft, about 5 minutes. Add remaining half of spice mixture and cook, stirring often, until bottom of pot begins to brown, about 4 minutes.
  • Add tomatoes with juices, crushing them with your hands as you add them. Bring to a boil, reduce heat, and simmer, stirring often and scraping up browned bits from bottom of pot, until sauce thickens, 8-10 minutes.
  • Add cream and chopped cilantro. Simmer, stirring occasionally, until sauce thickens, 30-40 minutes.
  • Meanwhile, preheat broiler. Line a rimmed baking sheet with foil and set a wire rack inside sheet. Arrange chicken on rack in a single layer. Broil until chicken starts to blacken in spots (it will not be cooked through), about 10 minutes.
  • Cut chicken into bite-size pieces, add to sauce, and simmer, stirring occasionally, until chicken is cooked through, 8-10 minutes. Serve with rice and cilantro sprigs.

how to make Chicken and Broccoli with Crispy Noodles recipe At Home


Hello friends,we are right back with new dish with Fantastic taste for you.i'm sure you will enjoy this recipe at your home.I hope you will follow the guidelines for making this recipe as given follows and wish you all the best for your cooking at your home and respond me about your dish.

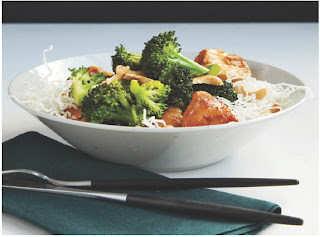
Chicken And Broccoli recipe At Home

Ingredients To Add in Chicken And Broccoli recipe

  • 1 tablespoon dry sherry
  • 1 tablespoon cornstarch
  • 1 tablespoon grated peeled fresh ginger
  • 2 pounds boneless, skinless chicken breasts, cut into 1-inch chunks
  • 1 cup vegetable oil
  • 4 ounces thin rice sticks or rice noodles
  • 1 1/2 pounds broccoli (1-2 heads), cut into small florets, stalks reserved for another use
  • 1/2 cup skinless almonds or raw cashews
  • 3/4 cup kecap manis or 3/4 cup soy sauce mixed with 1/4 cup packed dark brown sugar
  • 3/4 cup Chicken Stock , plus more if needed

Method To Make Chicken And Broccoli Recipe At Home


  • In a large bowl, whisk together the sherry and cornstarch. Add the ginger, then add the chicken pieces and stir to coat. Set aside.
  • Heat the oil in a wok or a 12-inch skillet over high heat until it reaches 350 degrees on a deep-fat thermometer. The rice sticks cook almost instantly, so have a slotted spoon and paper towels ready before you start. Take a handful of rice sticks, break into 2- to 3-inch pieces, and drop into the hot oil. They should puff immediately and become opaque—remove them as soon as they do to prevent burning and drain on the paper towels. Repeat, bringing the oil back to 350 degrees before you add more rice sticks, until all of them are cooked.
  • Pour off all but 2 tablespoons of the oil and return the pan to the heat. When the oil is shimmering, add the chicken, broccoli, and almonds and cook, stirring frequently, until the chicken is lightly browned all over, about 3 minutes.
  • Add the kecap manis and chicken stock and bring to a boil, stirring. Reduce the heat to medium-low, cover, and simmer until the chicken is cooked through and the broccoli is tender, 3 to 4 minutes; add a little more stock if the mixture becomes too dry.
  • Divide the chicken and broccoli among the plates, top with the crispy noodles, and serve.

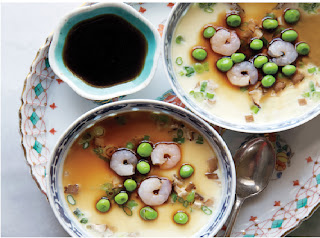
How To Make Chawan Mushi with Shrimp and Spring Peas recipe At Home


Hello friends,we are right back with new dish with Fantastic taste for you.i'm sure you will enjoy this recipe at your home.I hope you will follow the guidelines for making this recipe as given follows and wish you all the best for your cooking at your home and respond me about your dish.
Ingredients in Chawan Mushi with Shrimp And Spring Peas Recipe

Ingredients To Make Chawan Mushi Recipe

  • 2 teaspoons instant dashi powder (Japanese soup stock granules)
  • 1 tablespoon plus 2 teaspoons mirin (sweet Japanese rice wine)
  • 2 teaspoons reduced-sodium soy sauce
  • 1/8 teaspoon toasted sesame oil
  • 1/2 cup shelled fresh peas (from about 1/2 pound pods) or frozen peas, thawed
  • 12 baby shrimp or 4 large shrimp, peeled, deveined, coarsely chopped if large
  • 4 large shiitake mushroom caps, finely chopped
  • 3 large eggs
  • 2 scallions, whites and pale greens only, thinly sliced

Method To Make Chawan Mushi Recipe


  • Combine dashi powder, 1 tablespoon mirin, and 2 cups warm water in a medium bowl. Stir to dissolve powder. Transfer 1 tablespoon dashi mixture to a small bowl. Add soy sauce, oil, and remaining 2 teaspoons mirin; set dashi sauce aside. Set remaining dashi mixture aside for custard.
  • Set a large bamboo steamer over a large pot filled with 1" of simmering water. If using fresh peas, place in a small wide bowl and set bowl in steamer. Cover and cook until peas are tender, about 5 minutes (if using frozen peas, do not cook). Repeat with shrimp and mushrooms, placing each in separate small wide bowls, and cook in steamer until shrimp are just opaque and mushrooms are softened, about 2 minutes for each.
  • Gently mix eggs in a large bowl to blend (do not create bubbles); stir in dashi mixture reserved for custard. Pour custard through a fine-mesh sieve into a large bowl or a 4-cup measuring cup.
  • Toss peas, mushrooms, and scallions in a medium bowl and combine. Divide all but 2 tablespoons pea mixture among 6 small heatproof bowls or 8-ounce ramekins (set remaining pea mixture aside for serving); pour dashi custard over pea mixture, dividing evenly. Tightly cover each bowl with plastic wrap.
  • Place bowls in steamer, cover, and cook until custard is just set but still jiggles slightly in the center, 10-15 minutes.

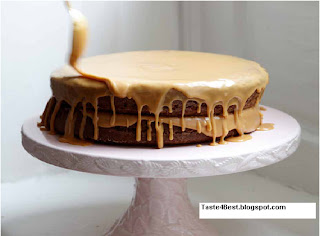
How To Make Caramel Cake At Home


Hello friends,we are right back with new dish with Fantastic taste for you.i'm sure you will enjoy this recipe at your home.I hope you will follow the guidelines for making this recipe as given follows and wish you all the best for your cooking at your home and respond me about your dish.
Caramel Cake Recipe At Home

Ingredients to Make Caramel Cake Recipe

Cake Ingredients For Recipe

  • 1 cup (2 sticks) unsalted butter, softened, plus more for the pans
  • 2 1/2 cups sifted all-purpose flour, plus more for the pans
  • 2 teaspoons baking powder
  • 2 teaspoons salt
  • 1/4 teaspoon baking soda
  • 2 cups sugar
  • 3 large eggs
  • 2 large egg yolks
  • 2 teaspoons pure vanilla extract
  • 3/4 cup whole milk

Icing Ingredients For Recipe


  • 1 1/2 cups whole milk
  • 4 cups sugar
  • 10 tablespoons (1 1/4 sticks) butter
  • 2 teaspoons kosher salt, plus more to taste
  • 1/4 teaspoon baking soda
  • 1 tablespoon pure vanilla extract
  • Hot water

Method For Caramel Cake Recipe


  • Make the cake: Preheat the oven to 350°F. Grease and flour two round 9 by 2-inch cake pans. Pour about a tablespoon of flour into each of the pans and roll it around, tapping as you go, until the sides and bottom are covered completely with a thin layer of flour. Tip the pans, and tap out excess flour.
  • In a large mixing bowl, mix thoroughly with a whisk the flour, baking powder, salt, and baking soda.
  • In a separate large bowl, beat the butter with an electric mixer until creamy, about 30 seconds. Add the sugar in 1/2-cup measures, beating about 15 seconds after each addition and scraping down the sides of the bowl if necessary, until the mixture has lightened in color and become fluffy, about 2 minutes. Add the eggs and egg yolks, one at a time, and the vanilla, beating for 15 seconds after each addition.
  • Add the flour mixture to the butter mixture in thirds, alternating with additions of the milk. To avoid overmixing the batter, mix gently with a wooden spoon or rubber spatula after each addition, until the ingredient is just incorporated. Beat until all the ingredients have been incorporated, and then just a few strokes beyond. Divide the batter between the cake pans and spread the tops evenly.
  • Bake until a cake tester or toothpick emerges clean, about 30 minutes. Remove from the oven and let the cakes cool in their pans on a rack for 10 minutes, then slide a thin paring knife around the edge of the pans, and invert the cakes. Turn each cake again so its rounded top is facing up, and cool the cakes completely on the rack.
  • Make the icing: Pour the milk and 3 cups of the sugar into a large, deep, heavy-bottomed pot over medium-high heat, mixing with a whisk. Add the butter and the salt, whisking occasionally until the butter melts. When mixture just simmers, cut the heat, but keep over the warm burner.
  • Pour the remaining 1 cup sugar into a saucepan. Cook the sugar over medium-high heat until it becomes a syrup, stirring every so often with a wooden spoon as it begins to brown, until the sugar syrup is evenly amber colored, 5 to 8 minutes. Pour the syrup into the warm milk mixture, being very careful, as the caramel will bubble and sputter when it hits the hot milk. Turn the heat beneath the pot to high and, whisking gently until all the syrup has completely dissolved into the roiling milk mixture, continue to cook to the soft-ball stage, about 238°F; this may take 8 to 12 minutes.
  • Cut the heat beneath the caramel and gently whisk in the vanilla and the baking soda. Dip a spoon into the caramel, and let it cool to taste it. Season the caramel to taste with salt, and pour it into the bowl of a standing mixer (or use an electric hand-mixer and a large bowl). Beat on low speed as it cools, 15 to 20 minutes depending on the temperature of your kitchen, until the icing is creamy and thick (between 100°F and 105°F). Remove the bowl from the mixer stand and let cool 5 to 10 minutes more, until the icing is between 95°F and 98°F—it should fall off your spatula in a ribbon that remains discernible on the surface of the icing for 10 seconds.
  • Set the first cake layer on a rack set over a sheet plan lined with waxed paper. Have an electric hand-mixer and the hot water nearby to blend a teaspoon or two into the icing if it becomes too thick to spread. Pour enough of the icing over the cake to cover the top in a layer about 1/4 inch thick (if it drips over the edge in places, that's fine; this is an early test of whether it's going to set in place or not). Top the first cake with the second cake layer and pour the rest of the icing in stages over the top of the cake, letting it run down the sides and using an icing spatula to guide the icing around the cake as it drips, until the entire cake is covered, for a traditional, classic look. (If you prefer the dramatic look of cake layers peeking out from behind a curtain of icing drips, by all means choose that route!) If you need to reuse any icing that overflows into the pan, simply move the cake on its rack temporarily, scrape up the icing from the waxed paper with a spatula and return it to the bowl, replace the rack over the pan, and continue to ice the cake.
  • Once the icing has set, using two spatulas carefully transfer the cake from the rack to a cake stand and let stand at room temperature beneath a cake dome until ready to serve. Only refrigerate if you plan to store the cake for more than 2 days.

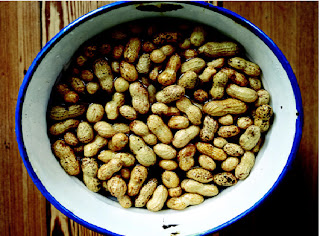
How To Make Boiled Peanuts At Your Home

Hello friends,we are right back with new dish with Fantastic taste for you.i'm sure you will enjoy this recipe at your home.I hope you will follow the guidelines for making this recipe as given follows and wish you all the best for your cooking at your home and respond me about your dish.
boiled peanuts recipe at home

Ingredients TO Make Boiled Peanuts At Home


  • 1 1/2 cups salt, plus more to taste
  • Hello friends,we are right back with new dish with Fantastic taste for you.i'm sure you will enjoy this recipe at your home. hope you will follow the guidelines for making this recipe as given follows and wish you all the best for your cooking at your home. and respond me about your dish.
  • 2 pounds raw peanuts in the shell, or 3 pounds green peanuts

Method To Make Boiled Peanuts At Home


  • In a 10- to 12-quart stockpot, stir 1/2 cup salt into 2 gallons of water until the salt dissolves, and add the raw peanuts. Use a large dinner plate or two to help submerge the floating peanuts. Allow to soak for 8 hours or overnight. (This step saves a little time boiling, and thus fuel, but if you don't have the luxury of time, skip this step. Skip it also if you're using green peanuts.)
  • Drain the soaking water and fill the pot of peanuts with 2 gallons of fresh water and the remaining cup of salt. Note the level of the water on the side of the pot. Bring to a boil, reduce the heat to low, and simmer, covered, for 6 to 8 hours (or 2 to 3 hours for green peanuts), keeping the water in the pot within an inch or so of its original level with regular additions of water, until the peanuts are soft as a roasted chestnut or softer.
  • When the peanuts have boiled for 3 hours (or 1 hour for green peanuts), sample them to check their texture and salinity. Remove a peanut, and when it is cool enough to handle, crack open the shell and give the kernel a chew, slurping some brine with it. If the peanut crunches, it should be cooked further. If the brine lacks enough salt, add by 1/4-cup amounts; if it is too salty, remove a portion of the water and replace with the same volume of fresh water. Allow an hour for the salinity to equalize before testing again. Sample every hour until the peanuts are pleasantly yielding and as salty and appetizing as a good pickle.
  • When the peanuts are cooked to your satisfaction, turn off the heat and allow them to cool in the pot for an hour (or 30 minutes for green peanuts). When cool enough to handle, drain and eat immediately or store in the shell, in a sealed container, in the refrigerator or freezer. (Boiled peanuts will keep for 7 to 10 days in the refrigerator and for several months in the freezer.)