Showing posts with label Cheese. Show all posts

Saturday, 9 March 2013

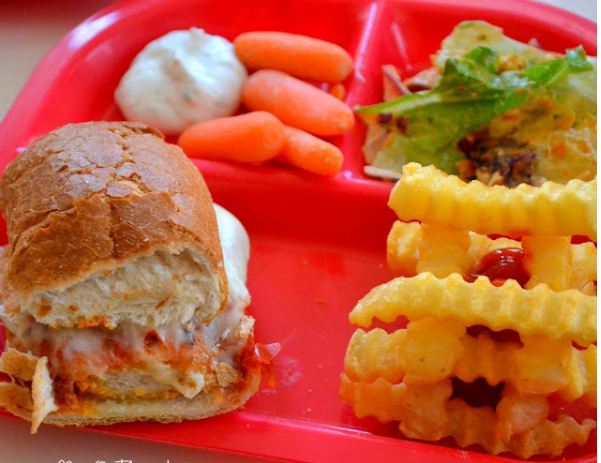
Easy, Cheesy, Chicken Parmesan Sandwiches & Family Game Night
Easy, Cheesy, Chicken Parmesan Sandwiches & Family Game Night


Ingredients:

  • Tyson Chicken Nuggets
  • Mozzarella Cheese
  • Marinara or Pasta Sauce
  • Parmesan Cheese
  • French Rolls
  • Ore Ida French Fries
  • Heinz Ketchup

Directions:
  • Cook the Golden Crinkles an Chicken Nuggets according to the package instructions.
  • While those are cooking, take out the rolls and sprinkle some of the Parmesan cheese on the rolls. Any Parmesan cheese will work – I happened to have some Shaved Parmigiano Reggiano cheese on hand. Throw those into the same oven and let the rolls toast for 3-5 minutes.
  • Once the Chicken Nuggets are cooked, place them on top of the rolls and sprinkle with more Parmesan cheese.
  • Spoon on 3-4 tablespoons of sauce.
  • And then cover with mozzarella cheese. You can use shredded, fresh, or slices. Whatever you have will work :)
  • Throw the sandwiches back into the oven and bake until the cheese is nice and melted {3-5 minutes} and get ready to enjoy!
  • For the kids’ plates I stacked the Golden Crinkles like Lincoln Logs because on Family Game Night – food is FUN too! I squeezed the Heinz Ketchup into the center for dipping – the boys LOVED this.

Broccoli, Bacon and Cheese Soup

Broccoli, Bacon & Cheese Soup


Ingredients

  • 4 -5 c broccoli florets
  • 5 slices of bacon
  • 1 medium onion, chopped
  • 1 shallot, chopped
  • 2 1/2 c - 3 1/2 c shredded cheese (I use a Mexican blend)
  • 2 c whole milk
  • 1 c half and half
  • 3 Tbls flour
  • 2 Tbls butter
  • 1 14 oz can low sodium chicken broth
  • salt and pepper to taste

Instructions

  • To start, slice some bacon into small pieces.
  • Saute the bacon in a large, deep skillet until nicely browned. Remove with a slotted spoon. Reserve 2 Tbls of bacon drippings and remove the rest.
  • Dice up the onion and shallot. I ended up with about 1 cup total.
  • Add the butter to the bacon drippings and let it melt. Add in the onion and shallot.
  • Cook for several minutes until translucent.
  • Add the flour and combine well. Let this cook for a minute or two to cook out the raw flour taste.
  • Add in the chopped broccoli and remaining ingredients except for the cheese.
  • Let the soup come to a simmer and then cover with a lid.
  • The soup needs to simmer for about 25-30 minutes - just until the broccoli is nice and tender.
  • Go ahead and turn the heat off. Now comes some more delicious flavor - the CHEESE! Depending on how ooey-gooey you like your soup to be you can add in more. I'd suggest starting with 2 cups and then adding in 1/2 cup increments till you reach your desired cheesiness. Mix the cheese in until it's melted into the soup.
  • If you like your soup chunky, you're done! If you like a more creamy, consistent texture, use an immersion blender of a blender to get your desired consistency. I used my blender and did it in two batches.

Friday, 8 March 2013

Festive Fall Cheesecake Leaves and Pumpkins in Brilliant Autumn Colors

Festive Fall Cheesecake Leaves and Pumpkins in Brilliant Autumn Colors


Ingredients:

  • butter, to coat the inside of your leaf mold
  • 16 ounces cream cheese, softened
  • 2/3 cup sugar
  • 1/3 cup heavy whipping cream
  • 2 large eggs
  • 1 teaspoon pure vanilla extract
  • red, yellow, green food coloring (orange, optional) - you can use natural food coloring, if you prefer

Special Supplies Needed:

  • food processor or a mixing spoon
  • baking sheets
  • 2 or 3 Wilton leaf and pumpkin silicone mold (you'll get 8 cheesecakes, so if you want all leaves you'll need 3 molds, otherwise you can make a few pumpkins)


Directions:

  • Preheat oven to 325 degrees Fahrenheit.
  • Butter your leaf molds. For stability, I always set my silicone molds on a baking sheet before filling them.
  • Make cheesecake filling:
  • Combine cream cheese, sugar, heavy whipping cream, eggs, and vanilla in the bowl of a food processor, pulse until smooth. Alternatively, mix cream cheese and sugar together until well blended. Add whipping cream, eggs and vanilla and mix until smooth.
  • Note: You don't want a lot of air in this mixture, so I don't recommend using a hand mixer.
  • Divide cheesecake mixture into three or more bowls, depending on how many colors you'd like in your leaves. Color each small amount with food coloring. To create orange, make yellow then add a bit of red coloring. To deepen the red color, add one small drop of green.
  • In a bowl, pour in about a 1/4 cup of two of your cheesecake colors side by side, leaving room for the third color. Add the third color.
  • NOTE: You do not want to swirl your colors in the bowl nor do you want to fill one big bowl with all of the colored fillings. They will get swirled as you pour them into the leaf mold. If you were to swirl them while they were in the bowl, by the time you made a few leaves the colored would look muddy.
  • Use a spoon to scoop out some of your cheesecake colors from the center of the bowl. See how each of the colors is still pretty separate?
  • As you spoon the filling into the silicone leaf molds, the colors will swirl.
  • Tap the mold several times to remove excess air bubbles after each scoop of cheesecake filling you add.
  • Fill the mold so that it isn't completely full, so there is room for the cheesecake leaves to expand while baking. I filled this one too full and ended up scooping some out.
  • You can see that I don't have a lot of cheesecake filling left in the bowl and that is good, as it gets swirled as the spoon goes in and out of the bowl and will start to blend all together. Top it off with your three cheesecake colors and repeat the process.
  • If you have two molds and want to make some pumpkins with your excess cheesecake filling, mix what you have remaining together. You should get an orange color. Adjust the color using food coloring if desired. Remove a teaspoonful and put in another bowl. Add a small drop of red and a small drop of green. Mix to get brown. Use a spoon to paint the brown cheesecake filling into the stem area of the pumpkin cavity. Pour the orange cheesecake filling into the pumpkin cavity.
  • You should have enough cheesecake filling to make 6 leaves and two pumpkins, or any combination, you choose.
  • Bake your cheesecakes for 20-24 minutes until the top forms a smooth film and the center is still giggly but not wet.
  • Allow your cheesecakes to cool for an hour then refrigerate for at least 3 hours.
  • Carefully turn the silicone mold upside down and set it over a baking sheet lined with parchment paper or a cutting board and gently tug at the mold pulling it away from the cheesecake, allowing the cheesecake leaf to fall out of the mold. You will want the cheesecakes cold in order to move them onto dessert plates, so do it now, or refrigerate the tray of cheesecakes and plate them later.


NOTE: 
  • I made these leaf and pumpkin shaped cheesecakes twice while developing this project. The picture above was my first batch of cheesecake leaves and pumpkins. I wasn't happy with all of the air bubbles and the texture of the cheesecakes were a bit dry, but I had taken all of my step-by-step pictures during this process, so I wanted you to see the first batch.
  • When I made the second batch, I added whipping cream to the recipe, which really made them much creamier, I intensified the colors a bit, I shortened the baking time, and I really tapped my molds to remove all the air bubbles.
  • They are ready to serve, but can be kept in the refrigerator for several days. Place them in an airtight container. To keep moisture from forming on your cheesecakes you can use this trick - place a piece of paper towel over the opening of your container and set the lid on top. Seal the container leaving paper towel showing all around the outside edge. Don't lay the paper towel directly on the cheesecakes.
  • Allow cheesecakes to sit at room temperature for about 30 minutes before serving

Sunday, 24 February 2013

Philly Cheese Steak Pizza

Philly Cheese Steak Pizza 


Ingredients :-
  1. 1 recipe Basic Pizza Crust
  2. 5 Tbsp olive oil
  3. 16 oz ribeye steak, sliced very thin
  4. 1 medium white onion, sliced thinly
  5. 1 green bell pepper, seeded and thinly sliced
  6. 8 oz mushrooms, sliced
  7. 12 jalapenos, roasted, peeled, seeded, and cut in half
  8. 1 cup cheddar cheese
  9. 14 slices Provolone cheese
  10. 12 oz mozzarella cheese
  11. 1/3 cup bread crumbs
What To Do :-
  • Preheat oven to 500 degrees F. If using a pizza stone, place it in the lower third of the oven and let it heat at least 45 minutes. Prepare crust for two pizzas according to recipe. Heat large skillet over medium-high heat. Stir-fry steak in one tablespoon olive oil until nearly cooked. Remove from skillet and let cool.
  • In same skillet, cook mushrooms in one tablespoon oil until soft. Remove from skillet and let cool.
  • In same skillet, saute onion and green pepper in one tablespoon oil until softened and lightly browned. Remove from skillet and let cool.
  • Stretch crust out to a 18 inch circle. Lay a ring of 12 jalapeno halves around the outside of the crust about an inch from the edge. Sprinkle half the cheddar cheese over the top of the jalapenos.
  • Fold outside edge of pizza over cheese and jalapenos and seal. Mix bread crumbs and one tablespoon olive oil. Brush outer ring of crust with remaining tablespoon of olive oil. Sprinkle half the bread crumbs over stuffed crust, pressing to ensure crumbs stick.
  • Place seven slices of Provolone cheese on bottom crust.  Top with half the steak, mushrooms, onions, and peppers. Sprinkle half the mozzarella cheese over top.
  • Bake at 500 degrees F for 8-10 minutes or until cheese is bubbly and crumbs are browned. Let sit 2-3 minutes before cutting.

Four Cheese Risotto with Bacon and Caramelized Onions

Four Cheese Risotto with Bacon & Caramelized Onions


Ingredients

  1.     6 slices of bacon, cut into pieces
  2.     1 onion, sliced thin
  3.     6 cups of stock or broth
  4.     Splash of olive oil
  5.     12 oz arborio rice
  6.     3 garlic cloves, minced
  7.     1/2 cup white wine, at room temperature
  8.     1 cup shredded sharp white cheddar
  9.     1/2 cup shredded monterey jack cheese
  10.     1 tbsp cream cheese
  11.     Pepper, to taste
  12.     Shredded Parmesan cheese, for garnish

Instructions

  •     In a large skillet, cook and brown bacon slices. Remove from skillet and place on a paper lined plate. Set aside. Add onions to same skillet and cook in bacon fat. Cook low and slow to caramelize onions. This will take 20-30 minutes. Add a little water if the skillet gets dry. When onions are brown, remove from heat and place on a plate. Set aside.
  •     In a sauce pan, bring stock or broth to a boil. Lower heat to low and cover with a lid.
  •     In the same skillet used for bacon and onions, add a splash of olive oil, rice and garlic. Stir until rice turns a light brown. Pour white white in skillet and stir until all liquid is absorbed.
  •     Using a ladle at a time, pour warmed stock/broth into the rice skillet. Stir until all liquid is absorbed. Repeat this step until rice is cooked to al dente. (can take up to 30 minutes.) If you run out of stock/broth, just add warm water.
  •     When the risotto is cooked, add cheddar, monterey jack and cream cheese. Stir until the cheese melts and is well combined. Add 1/2 of the onions and bacon to the skillet. Stir into the risotto.
  •     Taste and add pepper. (you won't need salt, trust me!) Top each serving with shredded Parmesan cheese, bacon pieces and onions. Serve warm.

Easy Apple & Goat Cheese Turnovers

Easy Apple & Goat Cheese Turnovers


Ingredients

  1.     2 apples, peeled and cubed. (I used 1 Granny Smith & 1 Gala Apple.)
  2.     ½ cup sugar
  3.     2 tsp. cinnamon
  4.     2 tbsp. butter
  5.     1 dash of salt
  6.     2 cups of water
  7.     1 can of Pillsbury crescent rolls
  8.     2-3 tbsp goat cheese crumbles
  9.     2 – 4 tbsp. water
  10.     ½ cup of confectioner’s sugar
  11.     1 tsp. of vanilla

Instructions

  •     Pre-heat oven to 350 degrees.
  •     In a medium sauce pan, add apples and the next 5 ingredients. Cook until almost all of the liquid evaporates. (the liquid should be thick like a syrup.) This step will take about 15 minutes.
  •     Roll out each crescent into a square shape. Take a spoonful of the apple turnover filling and place it in the center of crescent. Sprinkle goat cheese on top. Fold up the sides and pinch the dough to seal everything inside. Place turnovers on a grease cookie sheet and bake for 10-15 minutes, or until brown.
  •     To make glaze - combine water, sugar and vanilla. Stir until well combined and no clumps are visible. Drizzle over turnover and serve

Crunchy Caramel Corn vs Leaf Tags

Crunchy Caramel Corn w/ Leaf Tags


Ingredients:

  1. 5 quarts of popped popcorn (plain)
  2. 1/2 c butter
  3. 1/2 c corn syrup
  4. 2 c light brown sugar
  5. 1/2 tsp baking soda
  6. 1 tsp salt
  7. 1 tsp vanilla extract
Directions:

  • Preheat oven to 250 degrees.
  • Pop your popcorn – plain popcorn is best.  No salt or butter. Pick through your popcorn and make sure your remove all unpopped kernels.  An easy way to get rid of the kernels is to put in a gallon size bag and shake lightly – all the kernels will fall to the bottom of the bag. If you don’t have a popcorn popper, see my simple solution for popping popcorn in the microwave at the end of this post.
  • Keep your popcorn warm by placing it into two 9X13 baking dishes or a deep roasting pan and placing it in the oven.  The caramel corn turns out a lot better with warm popcorn so don’t skip this step!
  • Melt butter in a medium, heavy, saucepan over medium heat.  Stir in the brown sugar, corn syrup and salt and bring to a boil, stirring constantly.
  •  Once the mixture is at a boil, stop stirring and just let ‘er go for 4 minutes.  (This is the easy part!)
  • Remove from heat and stir in the vanilla and baking soda.  You will notice the caramel increases in volume – it gets very “fluffy”.  The consistency is thicker.
  • Pour the mixture in a thin steam over the popcorn.  Use tongs to mix the popcorn and caramel making sure to thoroughly coat.

The caramel corn should look like this going in to the oven.  Put the baking dishes into the oven and let bake for 45 minutes.  Every 15 minutes, pull the dishes out and break up the caramel corn using tongs to turn the popcorn over and mixing it up.  After 45 minutes, let the caramel corn cool completely before breaking into small pieces.  DO NOT POP THESE BEAUTIES INTO YOUR MOUTH OR YOU WILL GET BURNED.  Don’t ask me how I know this – just trust me.  That’s it!  It’s really very easy because there is so much down time.

Leaf Tags:


  1. Leaves
  2. Contact Paper
  3. Scissors

Directions:

  • Pick some multi-colored fall leaves and make sure they are clean.
  • Cut a piece of contact paper twice the length you will need for the leaves.
  • Place the leaves on the paper.
  • Fold the contact paper over and smooth making sure there are no air bubbles.
  • Cut out leaves and use as desired.
  • I used them to decorate my Caramel Corn bags:

Cheesy Brussel Sprouts with Bacon

Cheesy Brussel Sprouts with Bacon


Varities Include

Creamy Parmesan Basil: This creamy, full-bodied and indulgent sauce that was inspired by alfredo and creamy pesto sauces can be used to make dishes such as Crispy Garlic-Parmesan Chicken, Creamy Chicken Alfredo, Basil Chicken Ravioli Carbonara and Basil Chicken Thai Noodle
Creamy Roasted Garlic with Chicken Stock: With caramelized, roasted chicken broth, garlic and a touch of cream, this stock is perfect for dishes such as Creamy Lemon Chicken, Chicken Pot Pie and Chicken Enchiladas
Fire Roasted Tomato: A medium-thick tomato sauce, accompanied by flavors of roasted, caramelized tomatoes, oregano and bell peppers, which can be used as a great way to begin creating Pulled Chicken Sandwiches, Easy Weeknight Chicken Parmesan, Cheese-stuffed Mini Meat Loaves and Mole Tacos
Creamy Portabella Mushroom: Creamy and highly indulgent, this smooth sauce is rich with sautéed Portabella mushrooms, giving you any easy way to start delicious dishes like Easy Weeknight Beef Stroganoff, Steak and Mushroom Sandwich and Tetrazzini
Creamy Three Cheese: Rich and creamy with a blend of yellow and white cheeses, and a savory background of chicken stock, onion, garlic and cracked pepper, this is a great way to satisfy cheese lovers with Easy Weeknight Bacon Mac & Cheese, Twice-Baked Potato Pizza and Cheesy Egg Breakfast Tacos

Ingredients

  1.     1 1/2 lb fresh Brussels sprouts, 1 to 1 1/2 inch, cut in half (6 cups)*
  2.     2 tablespoons butter or margarine
  3.     1 medium onion, chopped (1/2 cup)
  4.     2 tablespoons Gold Medal® all-purpose flour
  5.     1 can (18 oz) Progresso™ Recipe Starters™ creamy three cheese cooking sauce
  6.     1/2 cup shredded Cheddar cheese (2 oz)
  7.     6 slices bacon, crisply cooked, crumbled

Instructions


  •     Heat oven to 350°F. In 3-quart saucepan, place Brussels sprouts and enough water just to cover sprouts. Heat to boiling; boil 6 to 8 minutes or until crisp-tender. Drain; place in ungreased 2-quart casserole.
  •     In same saucepan, melt butter over medium-high heat. Add onion; cook 2 to 3 minutes, stirring frequently, until crisp-tender. Add flour; cook until well blended (mixture will be thick). Gradually add cooking sauce until mixture is well blended. Heat to boiling, stirring constantly; boil and stir 1 minute. Remove from heat; stir in cheese until melted. Pour over Brussels sprouts in casserole; mix gently.
  •     Bake uncovered 25 to 30 minutes or until hot and bubbly. Sprinkle with bacon.

Chocolate Cherry Cake with Vanilla Cream Cheese Frosting|Chocolate Cherry Cake with Vanilla Cream cheese|Chocolate Cherry Cake with Vanilla Cream Chocolate Cherry Cake with Vanilla Cream cheese|preperation of Chocolate Cherry Cake with Vanilla Cream Chocolate Cherry Cake with Vanilla Cream cheese|steps of making Chocolate Cherry Cake with Vanilla Cream cheese|Chocolate Cherry Cake with Vanilla Cream cheese making|preparing Chocolate Cherry Cake with Vanilla Cream cheese|ingredients for Chocolate Cherry Cake with Vanilla Cream cheese|Chocolate Cherry Cake with Vanilla Cream cheese ingredients|directions for Chocolate Cherry Cake with Vanilla Cream cheese|Chocolate Cherry Cake with Vanilla Cream cheese instructions|Chocolate Cherry Cake with Vanilla Cream cheese manual|manual for Chocolate Cherry Cake with Vanilla Cream cheese preperation|instructions for Chocolate Cherry Cake with Vanilla Cream cheese making|what you need for Chocolate Cherry Cake with Vanilla Cream cheese|Chocolate Cherry Cake with Vanilla Cream cheese needed materials|Chocolate Cherry Cake with Vanilla Cream cheese recipe|recipe for Chocolate Cherry Cake with Vanilla Cream cheese|best Chocolate Cherry Cake with Vanilla Cream cheese recipe|popular recipe for Chocolate Cherry Cake with Vanilla Cream cheese|Chocolate Cherry Cake with Vanilla Cream cheese making|the best Chocolate Cherry Cake with Vanilla Cream cheese recipe ever|the best Chocolate Cherry Cake with Vanilla Cream cheese ever|forever Chocolate Cherry Cake with Vanilla Cream cheese recipe|old Chocolate Cherry Cake with Vanilla Cream cheese recipe|preperation steps for making Chocolate Cherry Cake with Vanilla Cream cheese|Chocolate Cherry Cake with Vanilla Cream cheese preperation steps

Chocolate Cherry Cake with Vanilla Cream Cheese Frosting

Chocolate Cherry Cake with Vanilla Cream Cheese Frosting


  1.     1 box cake mix, devil’s food flavor
  2.     1 can (21 oz) cherry pie filling
  3.     3 eggs
  4.     2 sticks butter, at room temperature
  5.     12 oz cream cheese, at room temperature
  6.     2 cups powdered sugar
  7.     1 tsp vanilla extract

Directions
  •     Pre-heat oven to 325 degrees. Butter/spray cake pan.
  •     Combine cake mix, pie filling and eggs. Stir until mixed. Pour into cake pan and bake for 30 to 40 minutes. Cool in cake pan.
  •     To make frosting – with an electric mixer on medium-high speed, beat butter and cream cheese until fluffy, 2 to 3 minutes.  Reduce speed to low. Add sugar, ½ cup at a time, and then vanilla, and mix until smooth and combined, scraping down sides of bowl as needed.
  •     Frost cake and serve.

Friday, 22 February 2013

Black Widow Spider Bites {#Recipe}

Black Widow Spider Bites {#Recipe}


Ingredients:

Oreo Cookies
Black String Licorice or Black Tube Licorice
Red Sparkle Gel

Directions:


When I went to the store to pick up string licorice I was told that it had been recalled and had been removed from the shelves.  Darn!  So I found some black tube licorice and cut it up into strips for the legs.  It took a few extra minutes but I can hardly complain since these take all of five minutes to put together :)
You can either push the licorice into the creme filling of the Oreo cookie or just pop the top off and press the legs into the creme filling.


Make sure you get all 8 legs in there good!


Put the top of the cookie back again and squeeze lightly.


Now to make these black widow cookies I squeezed a small amount of red sparkle gel on to the top of each spider.  Bam!  Black widows!a


Too cute and yummy too!

Beef & Butternut Squash Stew

Beef & Butternut Squash Stew

Ingredients :
  1.     3 tablespoon olive oil
  2.     1 onion, peeled and chopped
  3.     3 carrots, chopped
  4.     2 garlic cloves, chopped
  5.     1 tablespoon minced fresh rosemary
  6.     1 tablespoon chopped fresh thyme
  7.     2 pounds stew beef, cut into 2-inch cubes
  8.     1/2 teaspoon salt, plus more to taste
  9.     1/2 teaspoon freshly ground black pepper, plus more to taste
  10.     2 tablespoons all purpose flour
  11.     1 cup pinot noir
  12.     1 pound butternut squash, trimmed and cut into 2-inch cubes
  13.     1/4 cup chopped sun-dried tomatoes
  14.     3 to 4 cups beef broth
  15.     2 tablespoons fresh chopped flat leaf parsley

Directions:


    In a large soup pot heat 3 tablespoons of olive oil over medium heat. Add the onions, carrots, garlic, rosemary, and thyme and saute until the onions are tender, about 2 minutes. Toss the beef cubes in salt and pepper and flour. Turn up the heat to med-high and add the beef to the pot. Cook until the beef is browned and golden around the edges, about 5 minutes.
    Add wine. Using a wooden spoon, gently stir up all the brown bits off the bottom of the pan. Add the butternut squash and sun-dried tomatoes and stir to combine. Add enough beef broth to just cover the beef and squash. Bring the stew to a boil over high heat, then reduce the heat to low and simmer, covered, for 1 hour. Season the stew with additional salt and pepper to taste. Sprinkle with the chopped parsley.

BBQ Meatball Sliders, makes 12 meatballs

BBQ Meatball Sliders, makes 12 meatballs


For the meatballs:

    1 cup panko bread crumbs
    1/2 onion, cut into wedges
    1/2 cup parsley
    2 garlic cloves
    2 tbsp milk
    1 tbsp worcestershire sauce
    1 lb ground beef
    1 egg
    Salt & Pepper

Coleslaw Recipe:

    2 cups shredded cabbage mix
    4 scallions, sliced
    2 tbsp mayonnaise
    1 tbsp apple cider vinegar
    1/8 tsp celery seed
    Salt & Pepper

Additional Ingredients:

    Cooking Spray
    You favorite BBQ Sauce
    12 dinner rolls or slider buns (I used Hawaiian Bread Dinner Rolls. Perfect size for a slider!)

Directions:


For the Meatballs:

    Combine the bread, onion, parsley, and garlic in a food processor; pulse until finely chopped. Transfer to a medium bowl, add the milk and Worcestershire, and let stand for 5 minutes.
    Add the beef, eggs, 1 tablespoon salt, and 1 teaspoon pepper and gently combine. Form into 12 meatballs (about 1.5  tablespoons each)
    To cook immediately: Place the meatballs on foil-lined baking sheet sprayed with cooking spray. Broil for 10-12 minutes, or until no longer pink.

For the Coleslaw:

    Toss the cabbage and scallions with the mayonnaise, cider vinegar, and celery seed; season with ¼ teaspoon each salt and pepper. Set aside.

When you’re ready to assemble the slider, place meatball on the slider bun and top with BBQ sauce & coleslaw.

Avocado and Feta Salsa

Avocado and Feta Salsa


Ingredients

  1.     3 roma tomatoes, seeded and chopped
  2.     3 avocados, chopped
  3.     1/4 c cilantro, chopped
  4.     1/4 red onion, diced
  5.     1 clove garlic, minced
  6.     1 Tbls fresh lime juice
  7.     1 Tbls red wine vinegar
  8.     4 oz feta cheese, crumbled

Instructions
  •     Gently combine all ingredients.
  •     Cover and chill for a minimum of 2 hours before serving.

5 Cheese Roasted Red Pepper Spread

5 Cheese Roasted Red Pepper Spread


Ingredients:

  1. 1 Roasted Red Bell Pepper, diced (about 1/2 cup)
  2. 8 oz 1/3 less fat cream cheese
  3. 1 Tbls grated Paremesan Cheese
  4. 1 c Triple Cheddar Cheese Blend
  5. Ecce Panis French Demi Baguettes

Directions:

  • I started by roasting a red bell pepper and then dicing it up.
  • I used 1/3 less fat cream cheese (at room temperature) and whipped it in my mixer until it was nice and fluffy.  I added the red pepper, Parmesan cheese, and cheese blend to the cream cheese.
  • Go ahead and let the spread chill in the refrigerator while you prepare the baguettes.  The longer it has to chill, the better.  I just love the pretty color of this spread!
  • The baguettes require only 8-10 minutes in the oven and oh my do they smell amazing while they are baking away!  My husband must have asked three times during that short 10 minutes if it was time to eat yet!
  • Once they are done, slice away and serve!  Enjoy that lovely aroma as you cut the bread – mmm!

(5 Ingredient) Slow Cooker Ranch Seasoned Beef

(5 Ingredient) Slow Cooker Ranch Seasoned Beef


Ingredients
  1.     Cooking Spray
  2.     1 Onion, sliced
  3.     3lb Chuck Pot Roast, Boneless & seasoned with Salt & Pepper
  4.     1/3 cup Distilled White Vinegar
  5.     1 Hidden Valley Ranch Packet (1.0 oz)
  6.     2 Garlic Cloves, minced
  7.     1 tbsp water
  8.     6 French Rolls, sandwich size (optional)
  9.     6 slices of Mozzarella (optional)

Instructions
  1.     Spray crock pot with cooking spray. Add sliced onions and place beef on top. Mix vinegar, ranch packet, garlic and water. Stir and pour over beef. Cook on low for 8 hours.
  2.     To make sandwiches - shred beef and place in french rolls. Add cheese on top of beef. Broil in the oven until cheese is melted.